Search
Categories
"photo essay" #hdmoment #shuttersisters #sscolormonth #ssdecember #sselevate #ssmoment #thewrittenwords abstract adventure aperture archives art autumn babies beauty black and white blur bokeh books business camera bags camera gear cameras camp shutter sisters celebration, change childhood children cityscapes classes color community updates composition contests crafts creativity creatures details diptychs discovery documentary documentary dreams elevate equipment events events events everyday exposure expressive photography fall family fashion featured products film flare flash focus food found words found words framing fun gallery exhibitions gather giveaway giving gratitude guest blogger healing heart holidays holidays holidays home inspiration instant interviews interviews introspection iphoneography iso jump kitchen landscape landscapes laughter leap lenses life light love love macro mantra medium moment moments moments, mood motherhood motion muse nature nature negative space night photography Oasis one word project patterns perspective pets photo essay photo prompts photo walk, picture hope place places play poetry polaroid portraiture pov pregnancy presets printing process processing processing project 365 reflections savor self self-portraits sepia series shadow shop shutter speed simplicity sisterhood skyscapes soul spaces sponsors sports spring step still life stillness stillness story storytelling, inspiration style styling summer sun table texture thankful time tips tips, togetherness travel truths tutorial urban, video vignettes vintage vintage effects visual poetry water weather weddings weekend weekending windows winter words workflow you
« white space | Main | barometer rising »
Tuesday
Mar112008

Using Layers and Masks to Create Soft Effects

031108_600.jpg

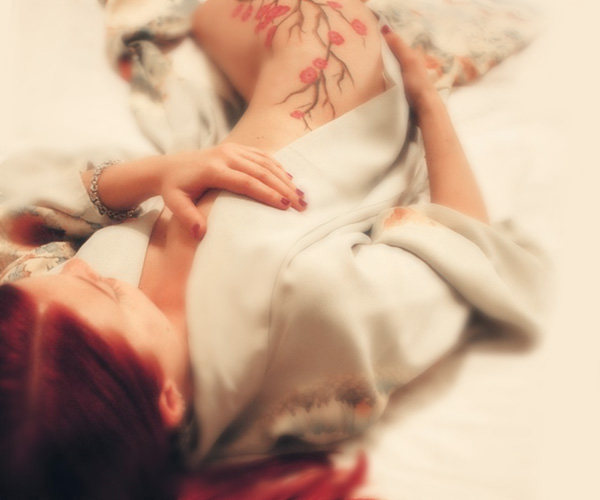
I love, love working with Anna. She's not only a great model, but due to our closeness and ability to read each other's minds, we always seem to create fabulous photographs together.  After her aunt passed away, we talked about doing a series of photographs with her aunt's robe, which further evolved into photographing her newest tattoo, a branch of vibrant cherry blossoms.

Because of her bright hair, the intense color of the blossoms, and the unique hue of the silk robe, I wanted to mute the rest of the image as much as possible. In addition to lighting and color manipulations, I also used Photoshop layers to create soft blurred areas.

First, I opened my layers palette (Window > Layers). At this time there was only one layer, my original photo. I selected the layer and dragged it to the New Layer button , creating a duplicate layer for manipulating.

I blurred the new layer with a Gaussian Blur (Filter > Blur > Gaussian Blur).  Focusing on the background -- since this would be the blurriest point of my image -- I adjusted the slider to the desired level.

Now it was time to erase the portions of the blurred layer to reveal the focused portions of the layer below it. Rather than use the eraser tool, I used a mask to give me more control and flexibility.

Here's how :

  1. I dragged my top (blurred) layer to the Mask button. (When you do this, you will see a new black thumbnail appear to the right of the image thumbnail in the layer.)
  2. I clicked the black thumbnail to select the mask. (When you do this, you will see the foreground and background palette colors switch to black and white.)
  3. Next, I switched my palette foreground color to black and "painted" the portions of the layer I wanted hidden. I did this with varied brush sizes and experimented with opacities to get the blur exactly where and how I wanted it.
  4. When I messed up, changed my mind, or wanted to dilute the opacity, I switched my foreground color to white to reveal the portions of the layer I wanted to show through.

You can use layers and masks for lots of things!  I frequently use them to cut an inch or two off tummies, remove double chins, delete ex-boyfriends from pictures -- experiment and have fun!


Reader Comments (25)

Thanks for this tip. Masks in Photoshop is something I still struggle with. The double chin removal factor sounds fantastic!
March 11, 2008 | Unregistered Commenterjen
Great shot, great colour hair - and I've never seen such a tattoo!
March 11, 2008 | Unregistered CommenterElspeth
Oh I love this - more PS tutorials please!
And that tattoo....wow.
March 11, 2008 | Unregistered CommenterJo
Yippee. I'm getting Photoshop soon, so I'll need all the tips I can get. Thanks.
March 11, 2008 | Unregistered CommenterShelli
i love this...
the meaning behind the robe...
that awesome tattoo!

and i so would love to know more about photoshop...
we have it but
ahem...
it scares me.
:)
March 11, 2008 | Unregistered Commentergkgirl
Lovin' the tattoo. Thanks for the tip.
March 11, 2008 | Unregistered CommenterMelody A.
Beautiful image! I love tutorials...keep 'em coming please!
March 11, 2008 | Unregistered CommenterStephanie
Thanks for this post! My camera is broken and will take weeks to repair so I'm using my time to learn more about Photoshop. Here's my first attempt at this method:

http://monkeymemories.blogspot.com/2008/03/shutter-sisters-using-layers-and-masks.html
March 11, 2008 | Unregistered CommenterGinny
A HUGE thank you for posting this! Finally, some instructions I can actually follow. Can't wait to try this out!
March 11, 2008 | Unregistered CommenterSarah-Ji
What a beauitful photo! I'm going to have to try this out.
March 11, 2008 | Unregistered CommenterMaya
And yes I just mis-spelled beautiful!
March 11, 2008 | Unregistered CommenterMaya
Thank you for the instruction! I have Pixelmator instead of Photoshop but a lot of it's tools seem to work the same way, I'll have to try it out.
March 11, 2008 | Unregistered CommenterRaven
Awesome photo! Wow! I love her tattoo too. You two do great work together.
julie
March 11, 2008 | Unregistered CommenterJulie
Gorgeous shot and gorgeous model. That tattoo is amazing and the way you picked up the detail on the back of the robe is wonderful.

Thanks so much for the lesson. I'm only now learning to navigate my way around Photoshop.
March 11, 2008 | Unregistered CommenterMama DB
I've not used the mask button much at all; something new to try. Any and all tutorials are welcome in my book!
March 11, 2008 | Unregistered CommenterShalet
I was with you up until the Mask part and then it didn't work the way you descibed at all. Would you consider using the Jing to so a screencast of the tutorial so we can see you do it? (I'm not trying to promote Jing but I use it and think it's an awesome way to post free screencasts which work so much better for tutorials)
March 11, 2008 | Unregistered CommenterMelizzard
@Melizzard: What specifically didn't work -- did you not see a mask on your layer?

@All: Wow, thanks for the response on this. I've had a lot of friends ask me to "teach them Photoshop" so I thought it may be something worth discussing here. I'm going to look at the screencast software mentioned here to see if I can better explain things... it's much easier to point at something and say "click that!" then to try and explain it in writing. ;)
March 11, 2008 | Unregistered CommenterKrystyn
Love the photo! I love Photoshop and once I learned to use layers and masks, a whole world of possibilities opened up.

I have to admit I've never tried getting rid of a double chin before. I could use a tutorial on that!
March 11, 2008 | Unregistered CommenterLawyer Mama
beautiful. you have captured something that has always troubled me as a person who loves to take photos. I am incredibly shy and think sometimes I use the camera for protection. I tend to take shots of things and places and not people.

To ask permission or not has always been a struggle for me.

and the result of your first foray into connecting with people in front of the lens is simply a stunning one.

I would love to have a copy of this photograph for my living room or writing room wall.
March 11, 2008 | Unregistered Commenterpondhopper
so sorry, i put this post in the wrong place! please discard the above post by me!
March 11, 2008 | Unregistered Commenterpondhopper
I tried to follow step by step and I got lost at #2. My layers mask did not allow to switch to black and white. So I must have done step #1 wrong. I am going to keep trying. I want to learn to trim some inches off my belly.

http://weaponsgrademoosedrool.blogspot.com/
March 11, 2008 | Unregistered CommenterNM
I love this photo for so many reasons - it is so strikingly beautiful. Thank you so much for posting it and the tips Krystyn!


I could only figure out part of this but hey, it's not midnight and I gave it a shot ;)

http://atheart.wordpress.com/2008/03/12/yellow-bird/
March 11, 2008 | Unregistered Commenternatala
This photo is just wonderful...so soft...Thank you for the instuction about working with layers...
March 12, 2008 | Unregistered CommenterClara
freelance writer
July 17, 2011 | Unregistered CommenterBette24Pittman
Most helpful for Pixelmator too, thanks :) (their 'help' pages aren't nearly so helpful!)
January 2, 2013 | Unregistered CommenterJas

PostPost a New Comment

Enter your information below to add a new comment.

My response is on my own website »
Author Email (optional):
Author URL (optional):
Post:
 
All HTML will be escaped. Hyperlinks will be created for URLs automatically.