Search
Categories
"photo essay" #hdmoment #shuttersisters #sscolormonth #ssdecember #sselevate #ssmoment #thewrittenwords abstract adventure aperture archives art autumn babies beauty black and white blur bokeh books business camera bags camera gear cameras camp shutter sisters celebration, change childhood children cityscapes classes color community updates composition contests crafts creativity creatures details diptychs discovery documentary documentary dreams elevate equipment events events events everyday exposure expressive photography fall family fashion featured products film flare flash focus food found words found words framing fun gallery exhibitions gather giveaway giving gratitude guest blogger healing heart holidays holidays holidays home inspiration instant interviews interviews introspection iphoneography iso jump kitchen landscape landscapes laughter leap lenses life light love love macro mantra medium moment moments moments, mood motherhood motion muse nature nature negative space night photography Oasis one word project patterns perspective pets photo essay photo prompts photo walk, picture hope place places play poetry polaroid portraiture pov pregnancy presets printing process processing processing project 365 reflections savor self self-portraits sepia series shadow shop shutter speed simplicity sisterhood skyscapes soul spaces sponsors sports spring step still life stillness stillness story storytelling, inspiration style styling summer sun table texture thankful time tips tips, togetherness travel truths tutorial urban, video vignettes vintage vintage effects visual poetry water weather weddings weekend weekending windows winter words workflow you

archived posts

Entries in focus (32)

Sunday
Sep072008

Sunday School: Shifting Focus


There's a lot going on right now in my life.  From work projects to a family vacation in our beloved Pacific NW to Cadence starting preschool at the end of the month, among other things.  Busy stuff, hard stuff, good stuff, fun stuff.  I've never been all that good at multi-tasking, so I'm having a hard time finding my focus these days.  In fact, stringing words together into a coherent post is kind of beyond my grasp right now.

Which brings me to the point of this week's Sunday School.  I've discovered that when you're on a shoot, and there's a lot going on and you just don't know what image to capture first, you can often get an interesting photo by shifting your camera's focus onto something that's not the actual focus of attention and letting everything else blur into the background (or foreground).  Doing a few shots like this may give you a clearer vision of how you want to document what's going on.  You may even find that what you're really interested in capturing is not what's actually the center of everyone else's attention.

Hmm...Maybe I can apply this little tidbit to my life right now.  Maybe what I need is to focus on something less obvious or even nothing at all for a while.  One of the things I actually like about the photo above is that when I stare at it, I feel like I'm zoning out, but in a really meditative way.   It's actually quite soothing.

Check out this uniquely focused and meditative photo by Amy Sahba, or this one by jennyhud and this one by Danisoul.  How about you?  Have you shifted focus lately?  Please share your images and/or stories.

Sunday
Aug172008

sunday school: double take


Truth be told, I'm not much of an abstract image kind of gal.  I consider myself more of a documentarian than an artist.   Recently however, when I was in the mood for  Breaking the Rules, I accidentally discovered a technique that creates abstract images that I find quite beautiful.  It's basically the equivalent of doing a double exposure (exposing the same piece of film twice resulting in superimposed images).  Now, I'm perfectly aware that in this digital age, you can accomplish this easily with two different photos using layers or what-nots in Photoshop, but don't forget that I'm a Photoshop flunkie.

There are a number of ways that you can do a digital double exposure.  I wouldn't be surprised if some cameras have a double exposure feature.  The simplest way to do it is to shoot in manual mode with a long enough exposure so that you can quickly reposition the camera in the middle of the exposure.  Repositioning can be as simple as turning around and facing the camera in the other direction.  Since I like to challenge myself, however, I've come up with a more complicated step-by-step approach. 

  • First, put the camera on manual mode and set the aperture pretty narrow so that you can do a long exposure (i.e., f/16 or f/22). 
  • Second, determine how many seconds you need to set the shutter speed at for proper exposure.
  • Third, double the amount from Step Two and then add 5-10 seconds to allow for repositioning the camera for the 2nd exposure.  So if the light meter says you need 5 seconds, set it for 15-20 seconds, depending on how fast you are at repositioning the camera.  I personally like the 30 second exposure because I'm slow and clumsy.
  • Once the exposure settings have been programmed, set the camera on a steady surface (tripod, table, ground, etc.), focus on your first subject, frame the shot and shoot (you can use the timer or a remote to minimize camera shake).
  • As soon as the shutter clicks, count off the number of seconds for the first exposure.
  • After the first exposure is done, immediately put the lens cap on the lens to block out light.  This will prevent light streaks in the final image from repositioning the camera, and your image won't be affected by camera shake while the lens cap is on.
  • Reposition the camera on a steady surface again so that the second subject you want is in the viewfinder, and as fast as you can, remove the lens cap while trying to keep the camera steady.
  • Hopefully, you will have timed it just right so that you expose the 2nd image properly.
  • Play around with the exposure settings until you get the results you want.


Since your camera is not re-focusing for the 2nd image, the clarity of the focus of the superimposed image may be out of whack depending on your aperture and the difference in distance of the subjects from the camera.  I personally don't think that a sharp focus is key to getting an interesting image with this technique.

How about you?  What's your favorite method of creating abstract photographic images?  For more inspiration, be sure to check out these images in our Flickr group pool by storygoil, Cyan Eyes, and Rachel Schell.

Sunday
Jul062008

Sunday School: Shooting From the Hip

070608_600.jpg

When I got my first digital SLR a little over a year ago, I did something kind of sily.  I called Nikon's technical assistance and asked the gentleman how to get my LCD screen to display the digital viewfinder.  I had been using a digial point-and-shoot  for over 5 years and had forgotten how to take photos looking through that tiny little peephole.  I can't tell you how embarrassed I was when the Nikon techie gently broke the news to me that as far as he knew, there was no digital SLR that had this feature*.  I was crestfallen.  To be unable to take photos from all kinds of crazy angles and perspectives and still be able to see what I was capturing before I clicked on the shutter?  I thought my photog days were surely over.

Well, I did get used to putting my eyeball to the peephole like the good old days with my film SLR but I still toyed with the idea of getting one of these really expensive puppies.  I'm glad I didn't, though, because I soon learned the joys of what folks call Shooting From the Hip.  That's when you shoot photos without looking through the viewfinder or composing the shot on the LCD.  I personally don't consider it shooting blind, however, and it's not the same as Just Shoot It when you click click click that shutter button without aiming or thinking. 

Shooting From the Hip is a skill that takes patience and practice.  You have to try it a LOT to learn how to angle the camera to aim it at what you actually want to shoot.  The more you try it, however, the easier it will get, and you'll love the freedom of being able to shoot without always having an eyeball glued to the tiny viewfinder or constantly looking down at the LCD.

One tip I have for Shooting More Accurately From the Hip is to use the focus-lock feature that most cameras have.  You can focus on what you want to shoot while looking through the viewfinder and then keeping the focus locked on it, reposition the camera and shoot.  In the photo above, I locked the focus on the pizza through the viewfinder, and then I positioned the camera at my chest level and pressed the shutter.  Another tip is to use the autofocus assist light (if your camera has one) to give you an idea of where your camera is pinpointing.  That should give you a clue as to whether you're aiming the camera at what you actually want to focus on. 

Whether your viewfinder is a tiny peephole or a digital LCD that twists and turns and does somersaults, Shooting From the Hip may become one of your favorite pastimes.  No matter how good your aim is, you never know exactly what you'll get, and THAT is the fun part.

Ready?  Aim.  Shoot!  And don't forget to share your Shooting From the Hip images and tips.

++++++++++++++++++++++++++++++++++++++++++++++++++++++++++++

*Edited to Add:  Actually, there are now dSLRs that come with a live view LCD.  Thanks to Laura of Dolce Pics for the heads up!

Tuesday
May062008

free

050708_600.jpg

This post is along the same lines as Tracy's yesterday, when she was talking about obsession. I think artists are especially interesting because the evolution of their life is out there for everyone to see. When I look back at my earlier work, with the perspective I have now, it seems like a whole different world. Buttoned up, and posed, and trying hard to be"perfect". My portraiture was an extension of how I lived my life, which was very aware of the critique. Then it started to get exhausting. There wasn't a turning point moment. Just the fact that lately I haven't been editing as much as I used to...in life or in photography. I'm not as afraid to show the messy bits...like the ones where mom is leaning in to fix her daughter's hair; or the ones that are so out of focus, they turn into impressions. People can make up their own minds. Either way I feel the same about my work, and about myself. I feel like I've begun to let go of the illusion of control. And my photographs (and I) are a teensy bit more free these days. What about you? Do you have any shots that make you feel this way?

Tuesday
Mar112008

Using Layers and Masks to Create Soft Effects

031108_600.jpg

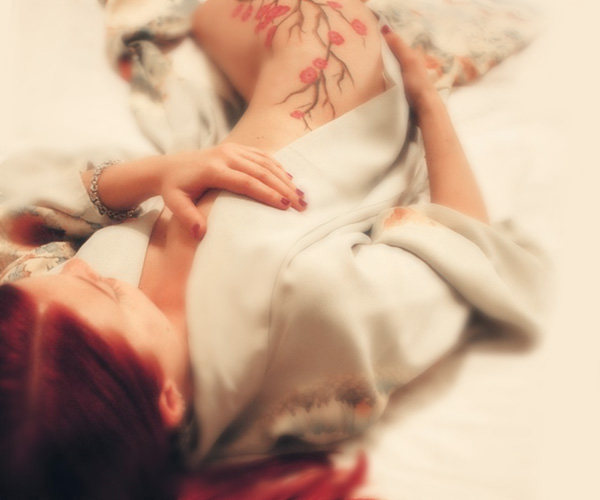
I love, love working with Anna. She's not only a great model, but due to our closeness and ability to read each other's minds, we always seem to create fabulous photographs together.  After her aunt passed away, we talked about doing a series of photographs with her aunt's robe, which further evolved into photographing her newest tattoo, a branch of vibrant cherry blossoms.

Because of her bright hair, the intense color of the blossoms, and the unique hue of the silk robe, I wanted to mute the rest of the image as much as possible. In addition to lighting and color manipulations, I also used Photoshop layers to create soft blurred areas.

First, I opened my layers palette (Window > Layers). At this time there was only one layer, my original photo. I selected the layer and dragged it to the New Layer button , creating a duplicate layer for manipulating.

I blurred the new layer with a Gaussian Blur (Filter > Blur > Gaussian Blur).  Focusing on the background -- since this would be the blurriest point of my image -- I adjusted the slider to the desired level.

Now it was time to erase the portions of the blurred layer to reveal the focused portions of the layer below it. Rather than use the eraser tool, I used a mask to give me more control and flexibility.

Here's how :

  1. I dragged my top (blurred) layer to the Mask button. (When you do this, you will see a new black thumbnail appear to the right of the image thumbnail in the layer.)
  2. I clicked the black thumbnail to select the mask. (When you do this, you will see the foreground and background palette colors switch to black and white.)
  3. Next, I switched my palette foreground color to black and "painted" the portions of the layer I wanted hidden. I did this with varied brush sizes and experimented with opacities to get the blur exactly where and how I wanted it.
  4. When I messed up, changed my mind, or wanted to dilute the opacity, I switched my foreground color to white to reveal the portions of the layer I wanted to show through.

You can use layers and masks for lots of things!  I frequently use them to cut an inch or two off tummies, remove double chins, delete ex-boyfriends from pictures -- experiment and have fun!